Monday, April 27, 2009
Time for a Class
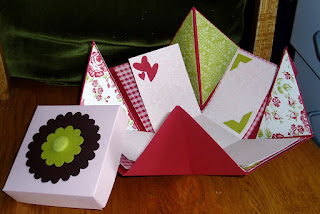
Would you like to make this Scrapbook in a box?
I'd love to show you how!! I'm offering a class May 30 at 10:00am at St Paul Lutheran Church basement.
This unique scrapbook is a combination of a scrapbook and an explosion box. You can pick the Designer Series paper that you would like to use from this list: Bella Rose, Urban Garden, Candy Lane, Bella Birds, Pink Flamingo, Good Morning Sunshine, Raspberry Tart, Sweet Always, Urban Oasis or Washington Apple. These are found on pages 150 - 161 in the Spring/Summer Idea Book and Catalogue.
The cost of the class includes the whole package of 12" X 12" Designer Series Paper (you'll use a few sheets and take the rest home), Textured Cardstock, Regular Cardstock and embellishments as well as written instructions so you can make as many as you like later.
Please Pre-Register and pre-pay by May 8th with your paper choice. This is so that I can order supplies and prepare them. You will need to bring you cutter and adhesive.
Date: May 30, 2009 Time: 10:00am Place: St Paul Lutheran Church Cost $25.00
Monday, April 20, 2009
A couple of Thank yous
Oh, hi there!! I haven't fallen off the earth - just been busy with one of my boys home. Anyway here's one of two thank you cards I made. This base is Baja Breeze textured CS and the image is stamped on Naturals Ivory CS. I used the grass image from Inspired by Nature which is on the Dormant list - it's available just not shown in a catalogue. And the sentiment is from Kind Thanks. The stamped butterfly is from Flight of the Butterfly and is stamped in Baja Breeze. The grass is done in Kiwi Kiss. The main image is matted with Chocolate Chip. Those cute 3D butterflies are made with the Big Shot die Beautiful Butterflies which is an exclusive Stampin' Up! die from Sizzix and of course I used the Big Shot itself. The butterflies are cut from Walk in the Park DSP which is in the Occasions Mini Catalogue - I think its so pretty! The ribbon is Pretty in Pink Taffeta.
Here's the second card I made with Kind Thanks
I used my old standby "Heartfelt Thanks" to do this one ~ it's one of the sets I got with my Starter Kit when I first signed up!! And I always find I can do pretty cards with it. The base of this card is also Baja Breeze Textured CS but this time I've added Pink Pirouette and Chocolate Chip. The "Thanks" and flower outlines are stamped in Chocolate Chip rather than Black. The ribbon is the Organza ribbon in the Main catalogue. It's pretty stuff - in the centre of the Organza is a solid satin line. Pretty! The flowers are stamped with Pink Pirouette and the centres are done with Super Nova Fine Glitter and Crystal Effects for some dimension.
That's all for now, see ya again soon! Joanne
Saturday, April 4, 2009
The cutest little Easter Basket!
Easy Easter Basket
Finally! Here's the tutorial I promised - it's been a crazy week and I ended up not feeling well but all is good now!
You can click on the pictures to make them bigger.
Supplies
6" X 6" Double sided Designer Series paper such as Patterns Pack II (L1 Hostess reward)
8 1/2" X 1/2" strip in matching cardstock
Snail Adhesive
Sticky Strip
Cutter with scoring blade
SU Cherry Blossom Embosslit
Big Shot
Steps
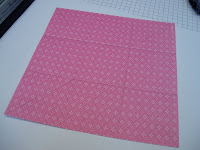
1. Score each side of the 6" X 6" DSP at 2"
2. Score each corner from where the score lines cross to the outer tip of the corner - do not score the centre box.
(I have darkened the score lines in this photo)
3. Fold on all score lines.
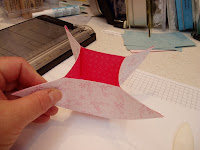
4. Place snail adhesive on each corner within the triangle space formed by the score lines.
See picture for placement.
5. Pinch the corner together as shown in the next picture and repeat on the other 3 corners.
Your box should look like this now:
6. Fold each flap over to one side of the box. Make sure you fold all flaps in the same direction. adhere them to the side of the box with sticky strip.
7. Attach the handle inside the box, making it as long as you like.
8. Decorate as desired. I used the Stampin' Up! Cherry Blossom embosslit and the Big Shot. I have pictures of that if you want to see it too.
You can also fill your little basket with 1/4" strips of cardstock that have been run through a crimper.
Hope you like it!
Subscribe to:
Posts (Atom)
My artwork (all original unless otherwise stated) is shared only for your personal inspiration, all products and stamps are from stampin' up! unless otherwise stated.